Scrumpy Planning Poker Documentation
Getting Started
The Scrumpy Planning Poker application can run in any web browser on all desktop and mobile devices. In addition to that it can be installed and work almost as a native mobile application via the Add To Desktop menu on Chrome, Safari and most of the popular browsers. The documentation below will help you smoothly run refinement sessions with Scrumpy Planning Poker.
Video tutorial
Please check this video tutorial for brief introduction how to use the application as a Jira add-on.
Documentation by features
Please check out our feature requests page for information about pending features and releases with detailed release notes. The release notes contain important information on how each feature works.
Signing in
The application needs the name of each participant so that the rest of the participants can recognize him/her. The names of the participants will be displayed in the right pane of the application. In addition to the name, an optional avatar can be used when signing in with certain methods. The following sign-in options are supported:
- Regular sign-in with just a name. No avatar will be displayed. This is the default option.
- Gravatar can be used by specifying a gravatar e-mail. In this case both the name and the avatar will be used. The e-mail will not be used and completely disregarded.
- Google sign-in. This is a regular social sign-in with Google. The Google display name and avatar will be used. The e-mail will not be used and completely disregarded.
- GitHub sign-in. This is a regular social sign-in with GitHub. The GitHub display name and avatar will be used. The e-mail will not be used and completely disregarded.
- GitLab sign-in. This is a regular social sign-in with GitLab. The GitLab display name and avatar will be used. The e-mail will not be used and completely disregarded.
- Jira user. When the Jira add-on is used, each Jira user becomes a participant and the Jira display name and avatar are used. No actions are needed, this is the default behavior for the Jira add-on.
Preparing a refinement/planning session
Before starting the refinement or planning session, the planning poker room needs to be prepared. The stories are added from the Story edit box with the add button ( ![]() ). The stories will be added to the list of stories to refine in during the upcoming planning/refinement session.
). The stories will be added to the list of stories to refine in during the upcoming planning/refinement session.
When using Jira integration (through the add-on or API token), the tickets to be refined can be selected with a JQL query. Then the tickets can be added one by one by pressing the add icon ( ![]() ) before each item in the drop-down list. Selecting tickets one by one by ID is also possible, e.g. DF17-1341.
) before each item in the drop-down list. Selecting tickets one by one by ID is also possible, e.g. DF17-1341.
Sometimes it is convenient to add the new stories on top, while in other cases it’s more convenient to add them to the bottom of the list of stories to refine. That’s why, there is a checkbox in the Settings page which controls whether items should be added to the top or to the bottom of the list of stories to refine.
Once added, the stories can have their summaries and descriptions changed. Don’t forget to press the Save button ( ![]() ) to persist the changes in the story summary and description.
) to persist the changes in the story summary and description.
The stories in the list of stories to be refined can also be easily re-arranged using simple drag and drop. To pick a ticket and drag it up or down, just click on the drag handle ( ![]() ) and move the item in the proper location.
) and move the item in the proper location.
To remove a ticket from the list, press the delete button ( ![]() ) at the right side of the item. To delete all tickets to refine and start adding tickets from scratch, press the remove all button (
) at the right side of the item. To delete all tickets to refine and start adding tickets from scratch, press the remove all button ( ![]() ) at the bottom right corner of the list of tickets to refine.
) at the bottom right corner of the list of tickets to refine.
Showing and hiding the optional panes
The application layout can be adjusted a bit depending on the amount of information that each participant would like to see on the screen. The three optional panes are as follows:
- The left pane (or refinement summaries) is the pane that can appear on the left side of the screen when pressing the (
 ) button. Depending on the screen size, the pane can either stay on top of the other widgets (when the screen size is small) or stick to the left if the screen size is wide enough. This pane shows the context menu for options, sharing, opening saved rooms (
  ) as well as a grouped list of refinement sessions. Each refinement session contains the tickets that have been refined. Optionally, if a story has to be refined yet again, it can be moved to the list of planned stories by pressing the refine again button (
  ) shown sideways at the refine story (available for Jira integrations only).
 - The right pane (or participants pane) is the pane that can appear on the right side of the screen when pressing the participants button (
 ). Depending on the screen size, the pane can either stay on top of the other widgets (when the screen size is small) or stick to the right if the screen size is wide enough. The right pane is used to display the current online participants, their voting status or vote depending on the state of the voting session, their certainty level, any early votes, etc.
 - The middle pane (story details pane) is the pane that can appear on the right side of the voting cards or at the bottom of the screen when a mobile device is used. This pane shows the story summary and description and is a convenience view which lets the participant stay in the application without the need to switch to another application (e.g. Jira). The pane is displayed by pressing the (
 ) button on the right of the screen.
Going to the settings section
The settings section is an important part of the application where all voting settings, visuals, integrations, voting styles and many more can be adjusted. To get to the settings section, press the gear button ( ![]() ) at the bottom of the list of stories to refine or from the context menu (
) at the bottom of the list of stories to refine or from the context menu ( ![]() ) at the upper right corner of the left pane where refinements summary reside.
) at the upper right corner of the left pane where refinements summary reside.
Sharing the planning poker room
After the application is started and stories are set up, the next task is to invite participants so that the collaborative voting session can start. This can be done via several ways, the most common one is to just copy and paste the browser URL (the link in the browser’s toolbar). The following options are also available:
- Clicking on the Share icon (
 ) will open a context menu that contains a menu entry to copy the link.
 - Clicking on the Share icon ( ) will open a context menu that contains a menu entry to send e-mail invitation to participants
- On desktop view the application shows a QR code that sends mobile users directly to the current planning poker room
Integrations
The application can be integrated with Jira through an API token and work outside of the Jira environment, or embedded in Jira as an add-on. When the Jira add-on is installed from the Atlassian Marketplace, each board becomes a room and each Jira user is mapped to Scrumpy Poker user and collaborative voting, chat and exchanging information in the planning poker room becomes immediately available.
Additionally, there is one common room for each project which can be used with cross-team sessions for refining stories from the whole projects, not just the current board.
An integration exists with Confluence through either the Jira API token (which provides access to Confluence automatically) or through the Confluence plugin available in the Atlassian Marketplace. Once the Confluence plugin is installed successfully, a Confluence space and page can be specified in the Settings section of Scrumpy Planning Poker. This space and page indicate the parent location in which refinement summary documents will be created. The refinement summary summarizes the stories that have been refined in the last refinement session, the average and the accepted story points. This page can be later used as a retrospective view to the planning/refinement session.
Scrumpy Planning Poker provides API for integrating with third party systems or embedding it in other applications. The example API and the key to access the room is available from the Settings page.
The API provided has a web interface that can be used for exploring its capabilities and testing the remote control of the voting process in a room. The API test environment is provided as a link inside the Settings pages.
Adjusting the audio and visuals
The game produces sounds and also may have too sharp colors and visuals distracting some of the participants from the voting process. This can be tuned from the Settings section of the application and the settings are specific to the current participant.
In case the sounds that the application produces are too much, they can be muted from the check box Enable Sounds. Sounds are enabled by default.
In case there is too much color on the screen, the colors can be reduced to gray-scale images. This way the fun images are still available, but in gray color.
In case even the gray color is too much, the cards can be converted to simple schematic card images which display the number of the vote only. This is the monochrome mode for cards.
Except the card images, the overall color scheme can be also changed. Currently there are 2 presets supported – light and dark. The light theme has the white color as a leading color. The dark theme has the dark gray/black as leading color. The theme is individual per participant and can be changed from the Settings page.
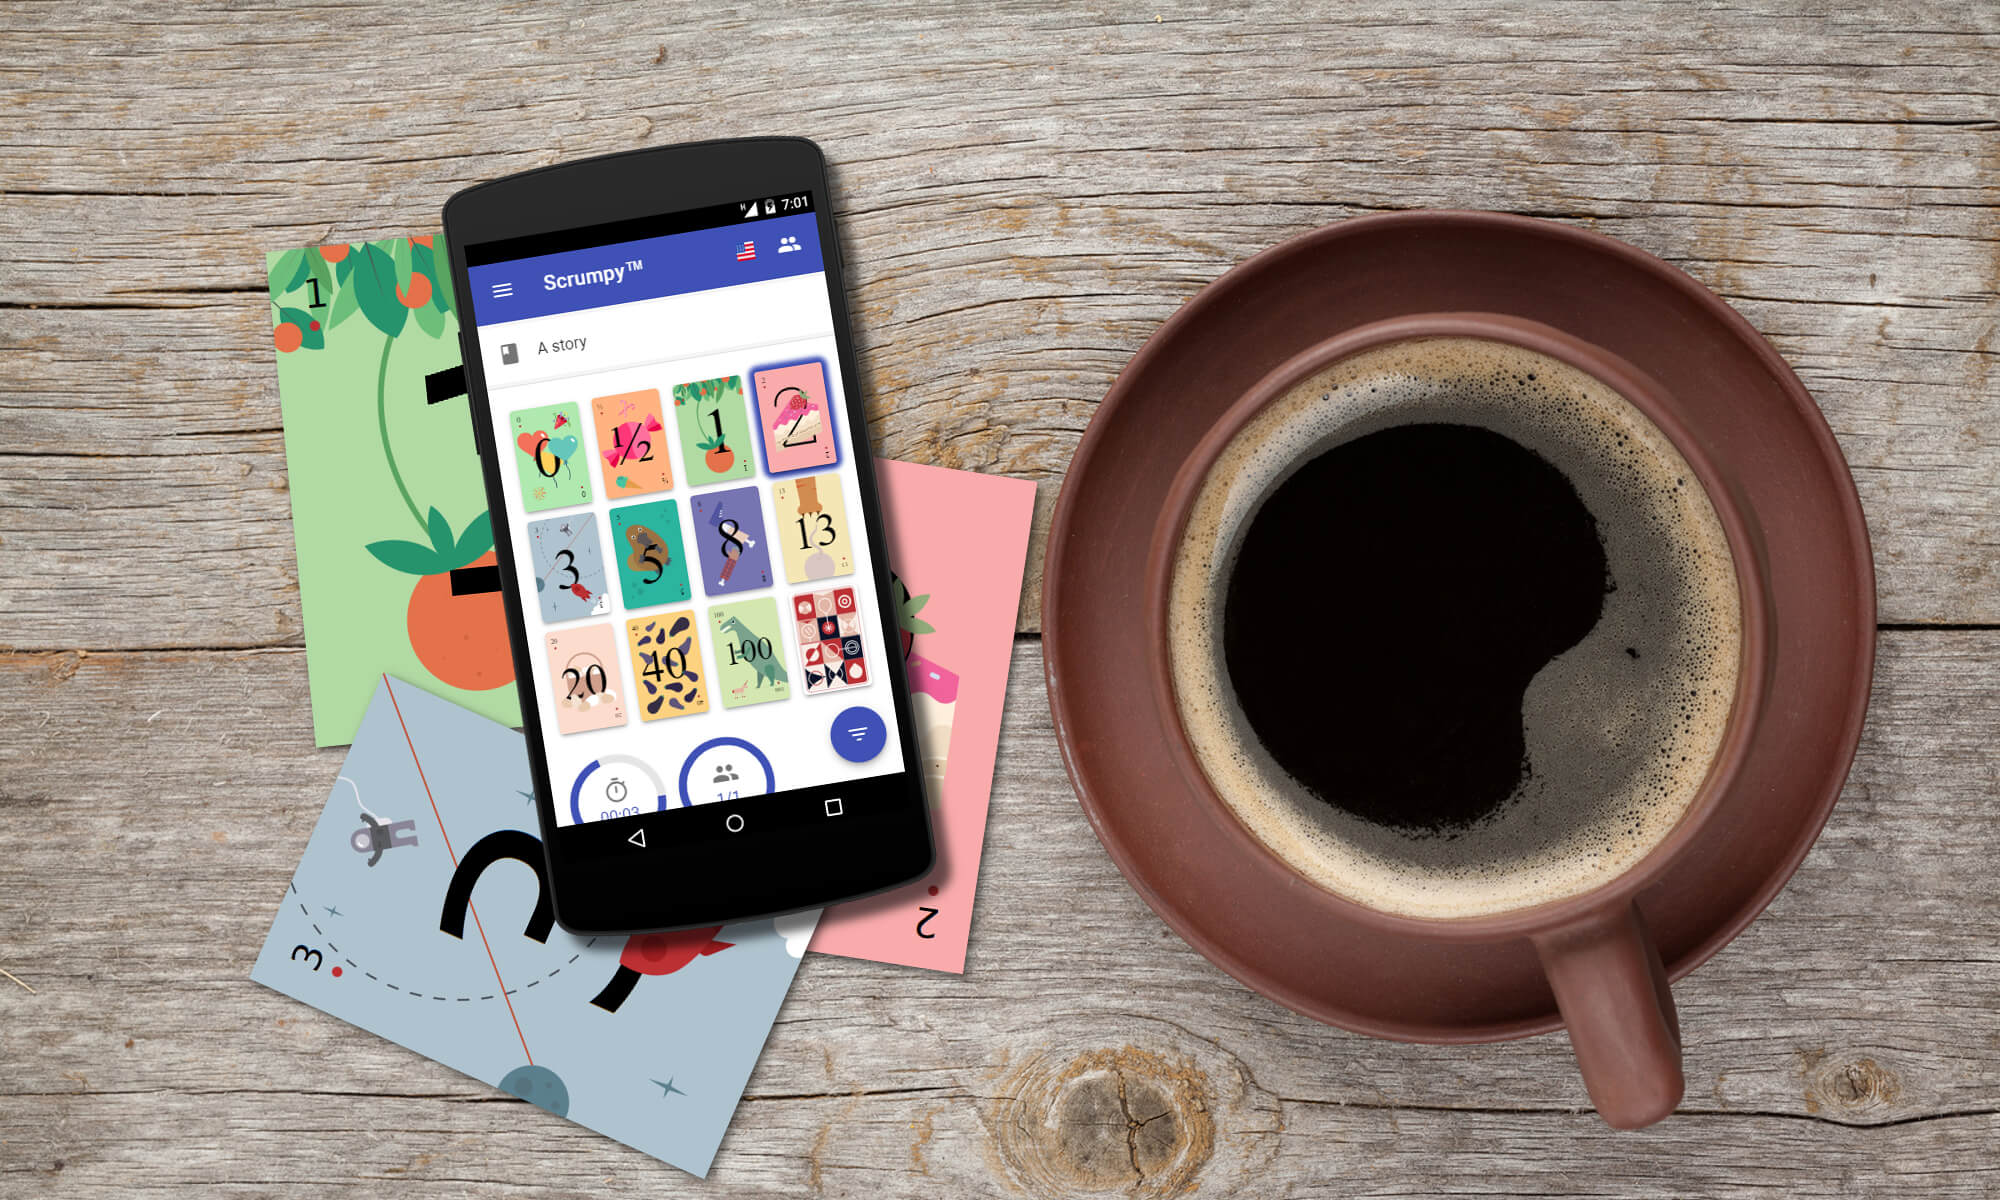
Types of cards
Several types of cards are available depending on the preferences for the whole planning room or for each ticket individually. When the settings for the whole room are changed, each ticket is refined the same way using the selected cards. It is possible to use presets that can be applied for each story making estimate a bit more flexible. The types of cards are defined as follows:
- Default sequence. The default card sequence is 0,0.5,1,2,3,5,8,13,20,40,100. It is useful for stories with that are more predictable.
- For big stories, it is preferred to use Fibonacci sequence 1,3,5,8,13,34,55,89,144. This sequence reflects better the unpredictable change of estimation accuracy with increasing of the story complexity.
- Finally, T-Shirt estimates are also available. Those types of cards are not bound to any specific story points and can be dynamically adjusted. They are useful for estimating bugs or estimating with time.
Optionally, cards that are not needed can be disabled from the Cards section of the Settings page. In this case they will be no longer visible in the cards display.
Card presets
Sometimes it is useful to have one preset for simple tickets (regular sequence), one preset for complex tickets (Fibonacci sequence) and one preset for bugs or tickets from a project that requires time estimates instead of story points (T-Shirt sequence). To allow this flexibility, card presets can be used.
The card presets are defined from the Cards section of the Settings page with a name. Each card preset must start with a unique letter so that those presets are easily recognizable later when assigned to specific stories. Up to 5 presets can be defined. Just type the name of the preset and press the Return key and the preset will be added. When a preset is selected from the preset drop-down, only the selected preset is modified. Other presets and the default voting cards remain intact.
Once defined, the card presets can be used in the list of tickets to be refined. By clicking on the ticket icon, a drop down with presets is displayed. By selecting a preset it is assigned to the current ticket and an indicator (badge) is displayed on the upper right corner of the ticket icon to indicate the currently assigned preset.
A preset can be also used to reset the voting cards for all tickets. When two or more presets are defined, an extra button is displayed ( ![]() ) which can be used to display a menu with a list of available presets. When a preset is selected, it is assigned for all tickets in the room from now on.
) which can be used to display a menu with a list of available presets. When a preset is selected, it is assigned for all tickets in the room from now on.
Ticket estimates
Correctly estimating tickets requires the adoption of the right process for the project. Some project use Scrum with story points estimates by the book, some projects though require estimating tickets with time, e.g. 2 days and 5 hours. Both estimates are supported by Scrumpy Planning Poker and can be defined as follows:
- Story Points estimates. This is the default estimating scheme which assigns story points to the Story Points field in Jira. To use story points make sure the Jira project is properly configured to not use time for estimates. Some tickets might be missing the Story Points field in Jira so please make sure it is added by the administrator and available to Scrumpy Planning Poker for update. Next Gen projects are also supported and in this case the Story point estimate field is updated.
- Time estimates. This type of estimate is optional and can be unlocked when the T-Shirt sequence is used. When switching to T-Shirt sequence in the Settings page either for the global settings or for a preset, an extra field will be displayed. This field contains the mapping between story points and time. It is a floating point number and has the value of 0 by default. If it is set to non-zero value and the Jira project has a configuration to use time estimates instead of story points, the Original Estimate and Remaining Estimate will be the fields that will be updated upon successful refinement of the story. Please make sure the Time Tracking and/or Log Work fields are enabled in the issue default screen.
Read-only vs. active voters
By default all participants in the refinement session can vote. In some cases though, it might be convenient that the moderator of the session (usually the Scrum Master or Product Owner) is not allowed to vote as this person is sharing the screen or is not eligible to execute a vote. This can be enabled or disabled from the default section of the Settings page called Moderator Voting.
In some other cases, it is convenient to disallow read/listen-only guests to participate in the voting and instead only advise and discuss the stories. Each regular participant can enable read-only mode for him/herself only by clicking on the Guest Mode switch ( ![]() ) at the bottom of the list of stories to refine. Guests are displayed at the bottom of the participants list in the right pane with a gray circle with indicator that those users cannot vote.
) at the bottom of the list of stories to refine. Guests are displayed at the bottom of the participants list in the right pane with a gray circle with indicator that those users cannot vote.
Starting and completing the vote
By default, the first participant who selects and estimate starts the voting session. A sound is played and the other users and the moderator see that there is someone who already voted. Sometimes this is dis-concentrating an causes other participants to be interrupted while they might be discussing important aspects. To disallow the starting of the vote by anyone at any time, please check the checkbox Disable voting auto-start in the Settings page. This way, only the moderator can start the voting process when ready by pressing the play button ( ![]() ) floating at the bottom right corner of the screen.
) floating at the bottom right corner of the screen.
When all the participants voted already, a sound is played and the game countdown timer is activated (10 seconds by default). The moderator can either forward or if anyone has questions to pause the game and allocate some time for additional questions. To remove this countdown period and immediately end the voting sessions when all participants have voted, you can enable the Complete when everybody voted checkbox int he settings page. This can save some precious seconds from the refinement session and expedite the planning.
Pausing and resuming
When the countdown timer is activated and someone is unsure about the estimate, it is always better to ask. With a countdown timer of 10 seconds it is not enough to ask a question. That’s why, the application allows to pause the voting process at any time by pressing the pause button ( ![]() ) floating at the bottom right corner of the screen.
) floating at the bottom right corner of the screen.
The game can be resumed again by anyone by pressing the (![]() ) button floating at the bottom right corner of the screen, usually after the question is answered and everything is clear. When everybody is certain enough and lets the game complete, the voting ends and the summary is displayed.
) button floating at the bottom right corner of the screen, usually after the question is answered and everything is clear. When everybody is certain enough and lets the game complete, the voting ends and the summary is displayed.
Forwarding and cancelling
The voting session moderator can at any time forward or cancel the voting. Even if not all participants have voted, at the moderator discretion it is possible to expedite the voting and end it. This can be done only by the moderator by pressing the fast forward button ( ![]() ) available from the bottom context pane.
) available from the bottom context pane.
In case something went wrong or someone objects that the ticket can be refined at all, the moderator can cancel the voting session for the current ticket. This can be done by pressing the delete button ( ![]() ) available from the bottom context pane.
) available from the bottom context pane.
Accepting the vote
After the voting is complete, a summary is displayed. The summary indicates the average vote as a number and the closest match in a voting card. The closest match is the mathematical rounding to the next or previous card. For example, 1.75 is rounded to 2 and 1.25 is rounded to 1 when the regular cards are used.
In some cases even the slightest doubt if the story points will be enough is enough to choose the higher estimate. In such cases the average estimate that is automatically selected can be overridden upwards or downwards with the arrows at the bottom of the summary page.
After the vote is accepted, the story points (or time estimate depending on the project setup) is updated and the refined story is added to the list of currently refined story in the ongoing session. If there are integrations with Slack or Jira the ticket is updated and a message is sent to the Slack channel.
Certainty level
In most cases, when the story is clearly defined, the participants can easily decide how to estimate it. When there is doubt though, participants can vote with different cards during the discussion process and always adjust their vote according to the new information that is being shared while the voting process is going on. Changing the opinion in most of the cases indicates uncertainty and may require more explanation or restarting the vote.
In some of the cases it is convenient to disallow any participant to start the voting session at any time and instead wait until the moderator clarifies the story, answers all questions and the team comes to an agreement that the story is clear enough. The voting depends on the information just shared and may not indicate some obvious problems with the story itself.
Another approach is to let participants vote, but display the number of changing of opinions. Scrumpy Planning Poker provides an option called Display Certainty in the settings page that allows to count the number of different votes per participant. The more the participant changes the opinion, the more uncertain the vote is. An uncertain vote mostly indicates that the story is not clear enough and may need rework. Also, the voting needs to be restarted for this story.
The application displays the change of opinion up to 6 times, it’s considered that it’s the most uncertain level and it doesn’t matter to count further. The overall average certainty is calculated at the end of the vote and can be used for indication to the moderator whether the vote is acceptable or not. The indicators for the number of changed opinions is displayed during the voting process so that the moderator can interrupt the voting at any time when the certainty level drops significantly.
By default the certainty level is not enabled and can be easily enabled from the settings page.
Video/Screen Sharing link
It is convenient to have a link to external conf call/screen sharing web session so that participants can quickly switch to it from inside the application. After participants join the planning/refinement session they would usually click on the video/screen sharing link to open the video/audio chat. Scrumpy Planning Poker displays this link at the top of the right pane.
Specifying such a link per room is achievable through the Settings page. By default there is no screen sharing link and the link is not displayed.
Refinement session time
The typical refinement session lasts between 30 minutes and 1 hour. This time can be set from the settings page in order to display a countdown timer to the end of the session. When enabled, the application shows a progress bar that is displaying how much time is left until the session is over.
This progress bar is used to remind the participants when the refinement is about to come to an end and to accelerate some of the tickets being refined or re-prioritize if needed.
Changing the voting time
By default the voting time is set to 10 seconds. This is the time from the start of the vote process till the end. The voting can be paused at any time so that this time is mostly used as a reminder to participants that time is ticking and they need to vote.
After the voting time is over, the summary page is shown which is used to discuss the results between the participants. At this point the vote can be accepted, restarted or cancelled.
The voting time can be changed from the Settings page and can be anything between 10 seconds and 300 seconds.
Voting reminder
It is sometimes convenient to remind the participants that it is about time to vote. A reminder bell button ( ![]() ) is available to the moderator once the voting starts to remind the participants who did not yet vote that it is a time to exercise their vote. When pressed, participants without a vote get a notification that it is about time to vote and a reminder sound is played if sounds have been enabled.
) is available to the moderator once the voting starts to remind the participants who did not yet vote that it is a time to exercise their vote. When pressed, participants without a vote get a notification that it is about time to vote and a reminder sound is played if sounds have been enabled.
Chat
The chat window allows exchanging text messages and creating micro-polls between the participants. The interface is similar to any chat program and display the messages in the form of dialogue between the current participant and the other participants. Additionally, there is a red message notification icon ( ![]() ) on the left side of the participant who sent a message. Once the message is read, the notification icon is removed.
) on the left side of the participant who sent a message. Once the message is read, the notification icon is removed.
If the text message contains a link, it will be automatically converted to clickable link and when clicked will open the target in a separate tab of the browser.
Micro-polls
Each chat message can be converted to up/down vote to collect pro- and anti- votes for a particular question or collect simple likes. Those questions typically ask participants whether the story should be re-voted or if the team agrees on something.
To create a poll click on the context menu icon of the message (![]() ) and select the type of poll:
) and select the type of poll:
- Collect up-down votes. This type of poll appends up (
 ) and down (
  ) votes buttons that are used to count pro- and anti-votes. The counters can be used to make elaborate decision whether to consider the question in the poll or not.
 - Collect likes. This type of poll appends a heart button (
 ) and counts each click. This type of poll can be used to collect minimum votes to proceed with a certain action.
Can’t find what you need?
In case there is a feature that you’re missing, please feel free to submit one. We’ll carefully review it, consider it and eventually implement it. You can find the list of features at our Feature Requests page.